Google Snapseed is one of the best photo editing apps you can find. It has so many amazing functions that can take your photography game to the next level. Whether you have an Instagram account you love to curate, or you want to have professionally edited photos for your business, learning how to use Google Snapseed is a must. You will have powerful tools always within your reach on your smartphone.
In this article, we will show you how to edit photos with this amazing app easily by showing two examples. You can edit a photo in Google Snapseed with just one tap on the screen, or you can experiment and use your imagination to create works of art. You will find a useful link to content that goes into more detail about some tools in the Google Snapseed app at the end of the article.
Download Google Snapseed from Google Play for Android devices, or the App Store for iOS. It is completely free with no in-app purchasing.
Once you download and open the app, you are ready to learn how to use Google Snapseed with the following, simple guide:
When you open Google Snapseed to edit photos, tap on the plus icon and choose an image you want from the gallery on your mobile device.
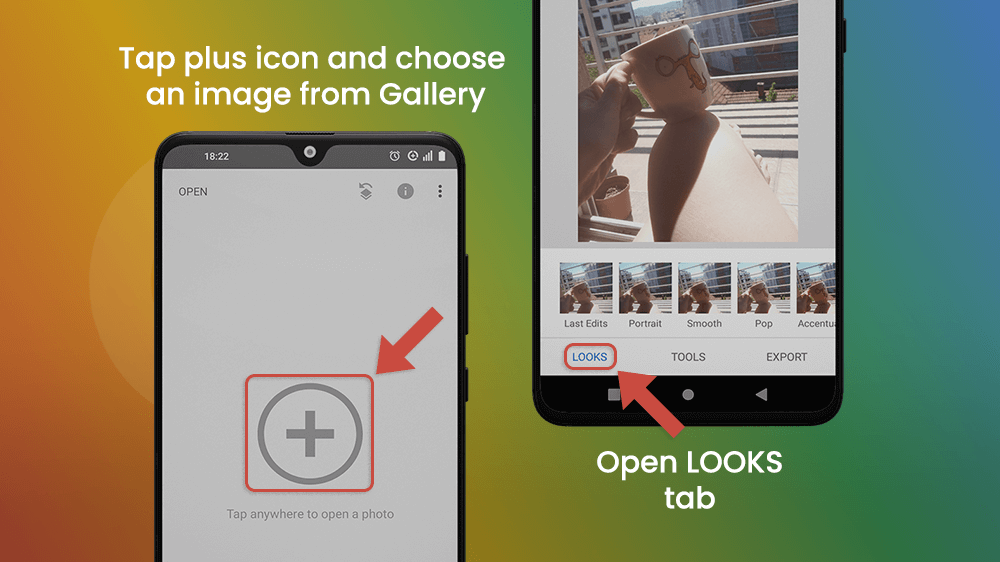
Under the image are three tabs.
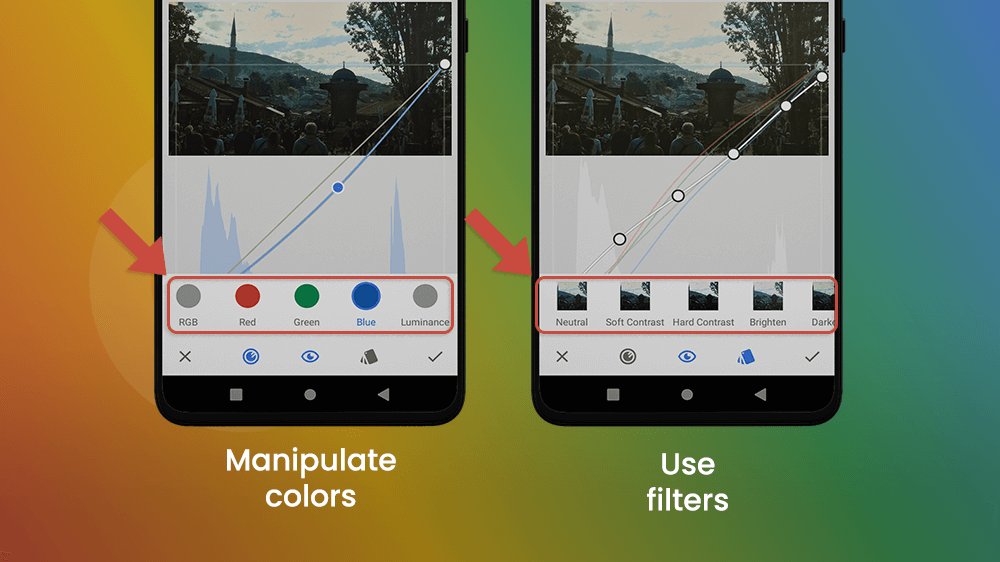
In the LOOKS tab, you will find preset filters, so you can edit your photo with just one tap.
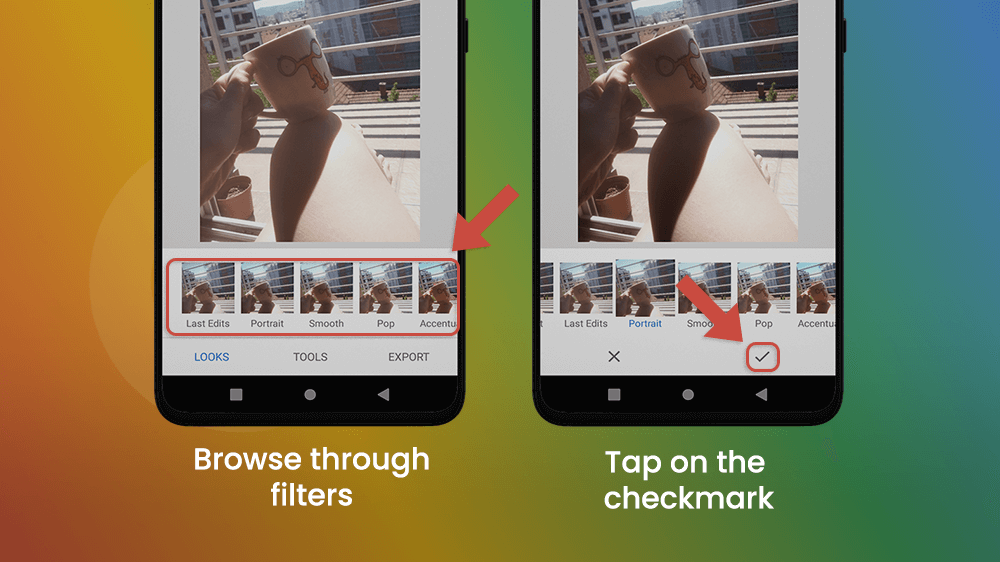
These filters can adjust various aspects of a photograph like light and colors.
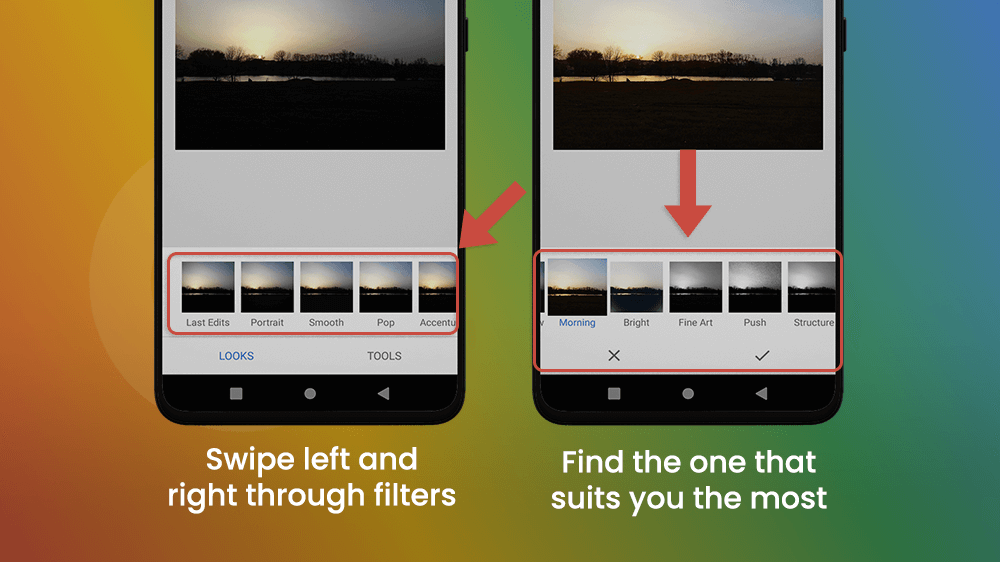
It’s very easy to use and right at your fingertips.
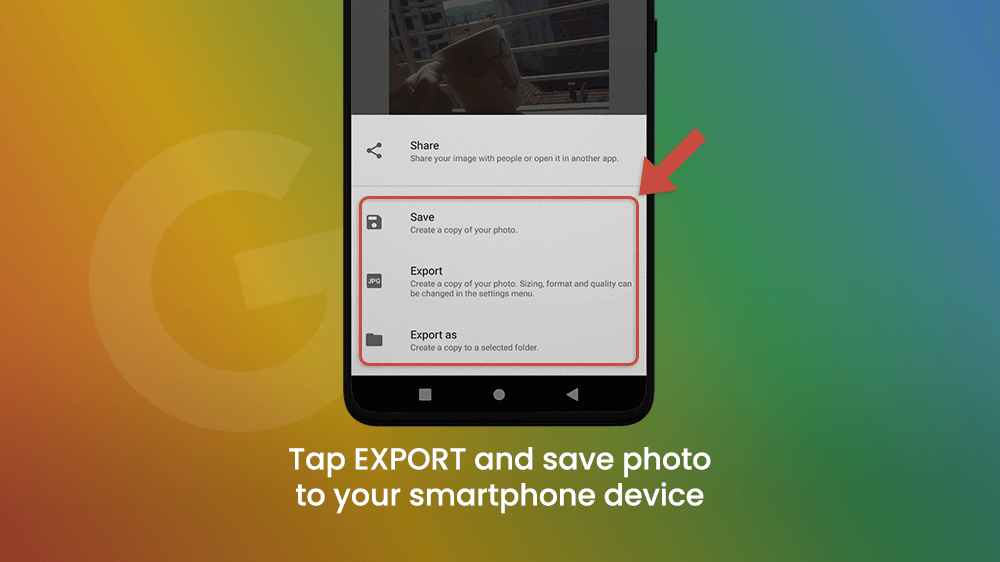
The third tab titled EXPORT allows you to save the edited photo on your device as a copy, or share the photo instantly to any other platform.
If you want to become an expert on editing photos with Google Snapseed, find out about the editing options first, located in the middle tab TOOLS.
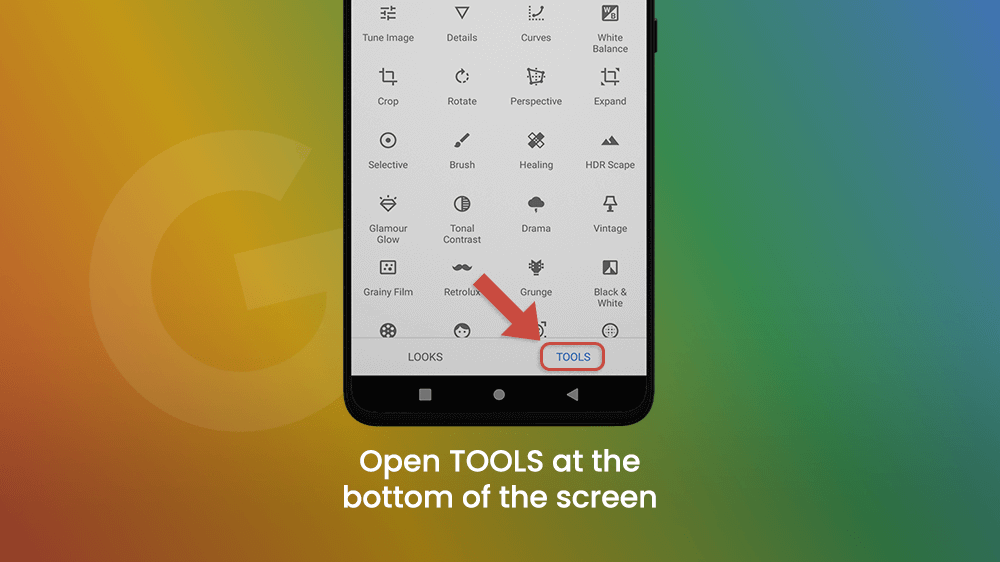
Let’s explore all the tools available on Google Snapseed through examples of the editing process.
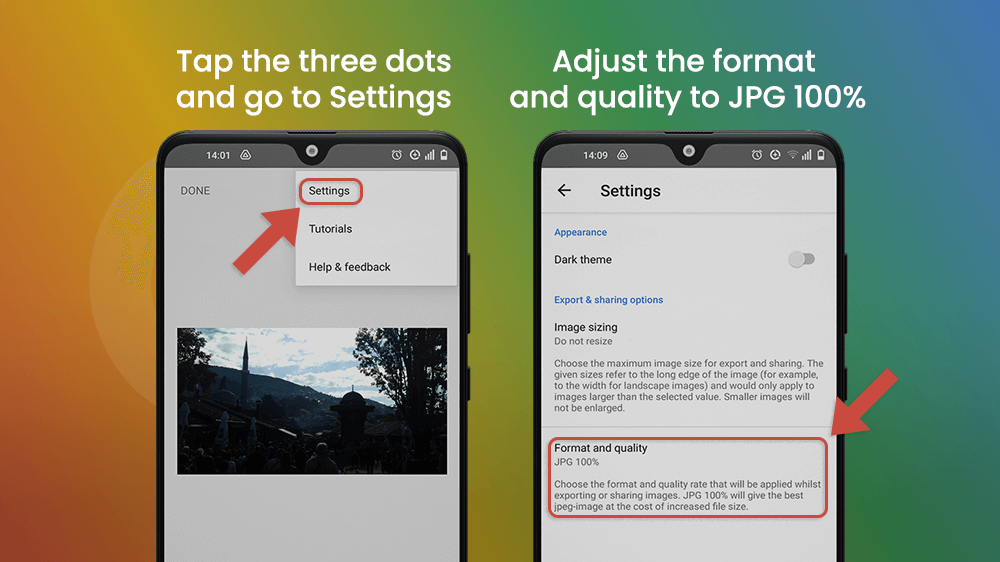
Before you begin, adjust the format and quality to JPG 100% to make sure you have the best quality image possible. Tap the three dots in the upper right corner of the screen to go to Settings. There you will find the Format and quality bar. Set the quality to 100%.
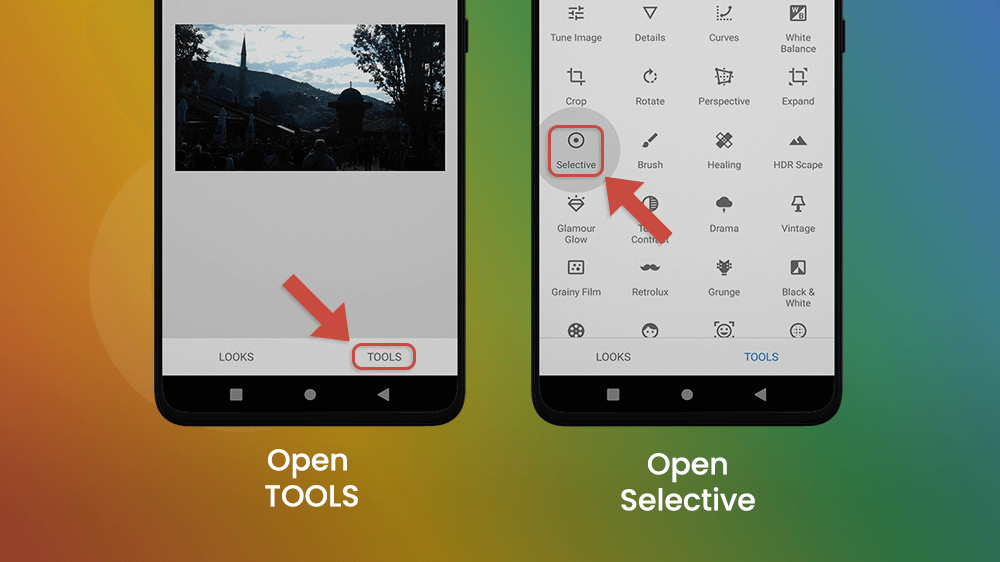
I have an image that has areas that are heavily contrasted. The lower half of the image is much darker than the sky, which is too bright, and the middle part is blurry. I will edit those three areas separately using Selective editing in the TOOLS tab.
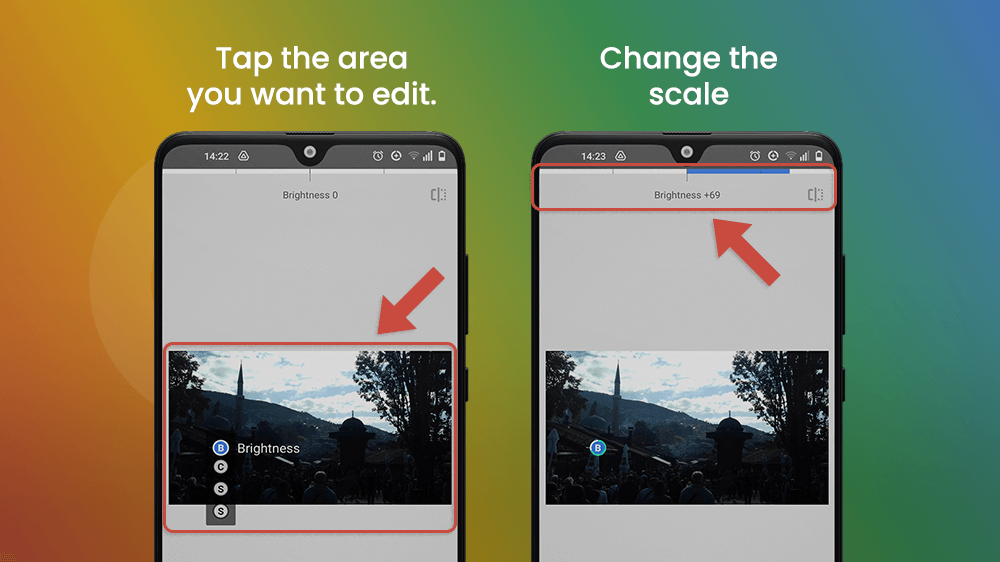
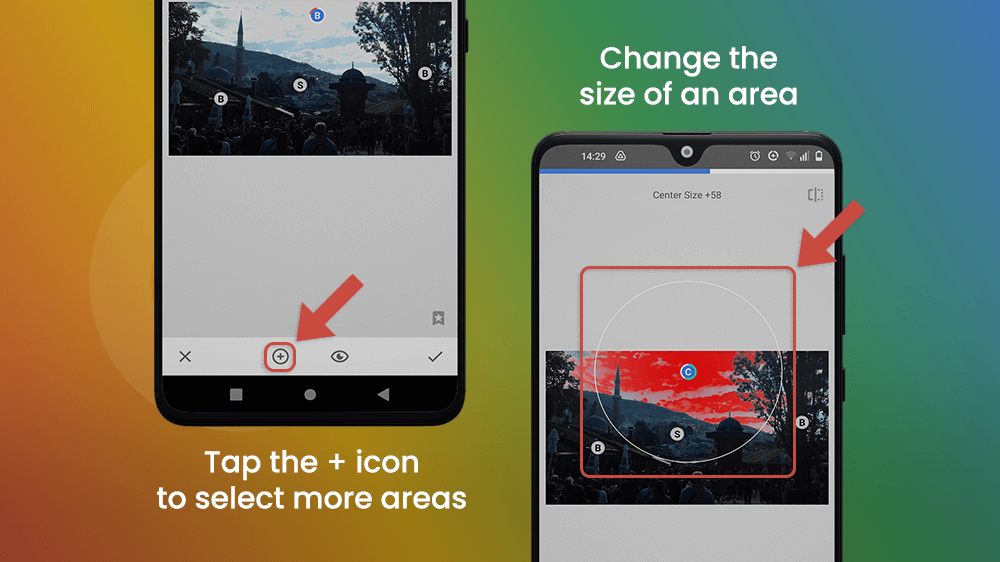
To use this tool, tap the area you want to edit. You can choose to edit its brightness, contrast, saturation, or structure by dragging your finger UP or DOWN below the little circle. I will increase the brightness in the left part of the picture. At the top of the screen is the scale of brightness that you can change by dragging your finger LEFT or RIGHT over the image.
To select more areas, tap the plus icon at the bottom of the screen and place the dot on the image where you want to edit. I will complete this image by increasing the brightness on the right and on the left, by decreasing the brightness of the sky, and by enhancing the structure in the middle of the image. To change the size of an area you want to edit, drag your fingers away from each other and the center of the edited area in a zoom out or zoom in motion.
The Selective tool is one of the most useful and versatile tools for editing a photo in Google Snapseed. Within just a couple of minutes, you can change the quality of your images drastically.

The basic tools when editing any photo, like overall brightness, contrast, and saturation, are in the TOOLS tab under Tune Image.
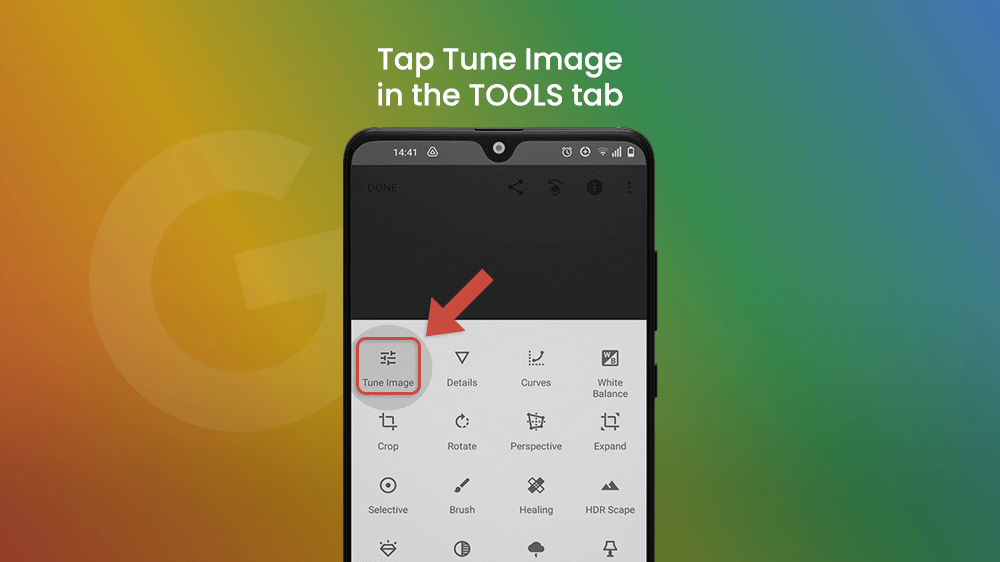
Select one of the editing options by taping the tuning icon at the bottom of the screen. At the top of the screen is a bar showing the scale of the image’s aspect you want to adjust. To change it, drag your finger across the screen left or right.
The magic wand icon symbolizes the Auto Adjust function. When selecting it, you apply specialized AI technology to do the job for you. And it works pretty well.
If you want to learn how to use Google Snapseed, you should know that it is a powerful software with many options.
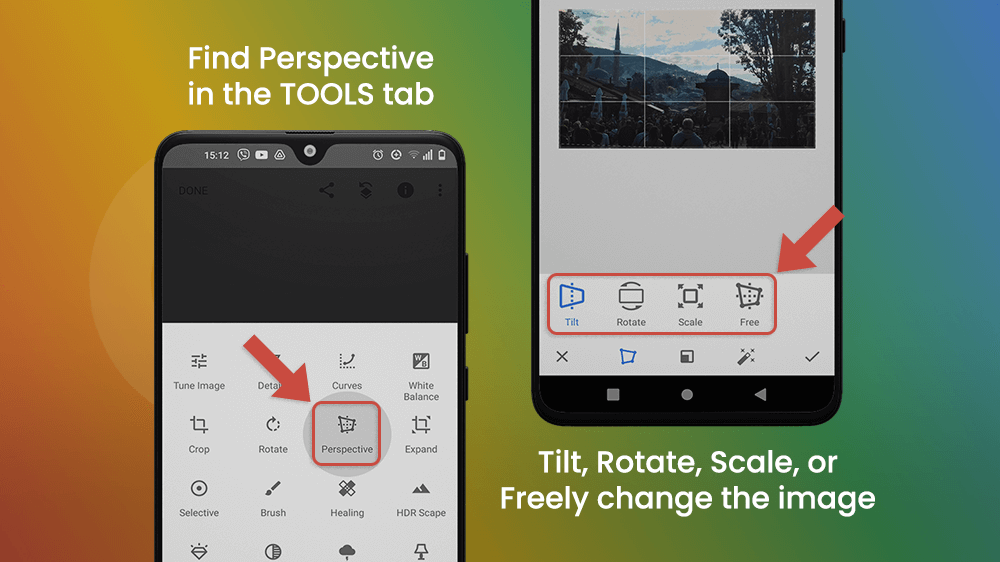
Let’s say your image is crooked. The axis of the image is not perfectly aligned, or an object you wanted to be in the middle of the image is positioned a bit to the side. You can use the Perspective tool to even out the composition of your photo. When you change the perspective, some parts of the image will be cut out, but the Google Snapseed AI will fill them out based on its predictions of what should be there.
It is kind of cheating, and it may distort the image if used too much, but it can be a useful trick to know.
Find the Perspective icon in the TOOLS tab. You will find options to tilt, rotate, scale, or freely change the image by stretching or shrinking any part of it. Drag your fingers over the image to manipulate it.
This is not a body shaping tool. You can use it to increase or decrease the amount of color present in your image, or the strength of the whole color scale. It includes pretty built-in filters as well.
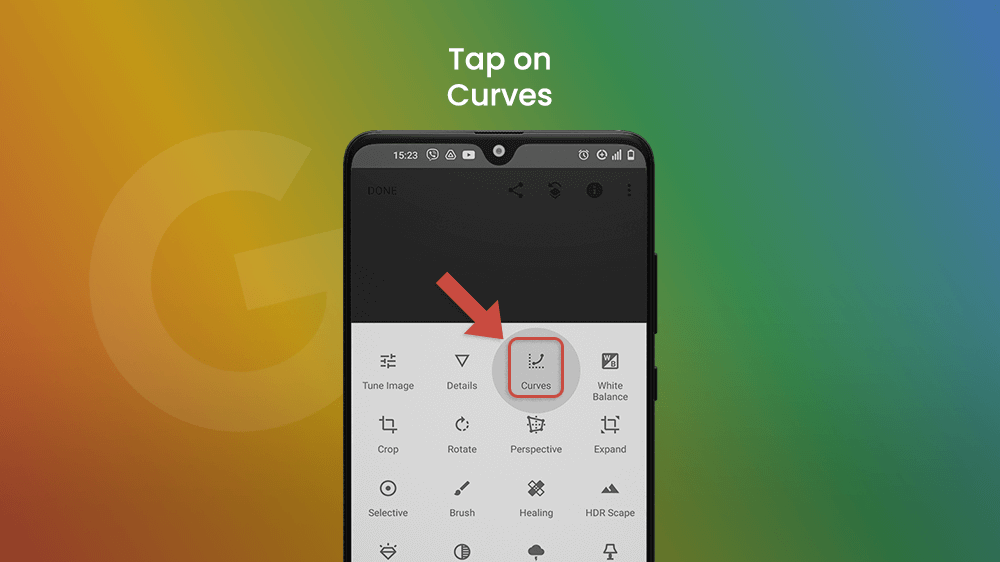
Let’s say I want to reduce the blue in my image. I will tap the circular icon at the bottom of the screen, then choose Blue and drag the line to the right with my finger. That will transform the blue tones to their complementary yellowish tones (reminder: complementary colors are colors on opposite sides of the color wheel). Dragging left will enhance the blue. The icon at the bottom of the screen showing a set of cards contains over twenty filters you can choose from, with different curvatures of the color vectors already set.
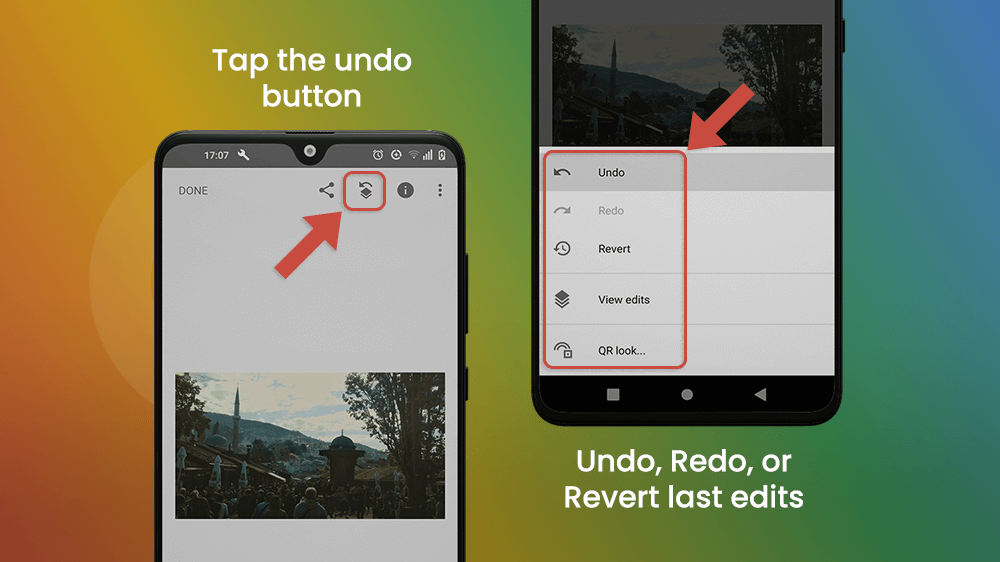
Is there anything more useful in life than the undo button? In Google Snapseed, the undo icon is in the top right corner of the screen. You can undo the last edit you made, or Redo it if you change your mind. If you want to start over, tap the Revert button and erase all edits made in that session. I want to undo the last filter set on our example image with the Curves tool.
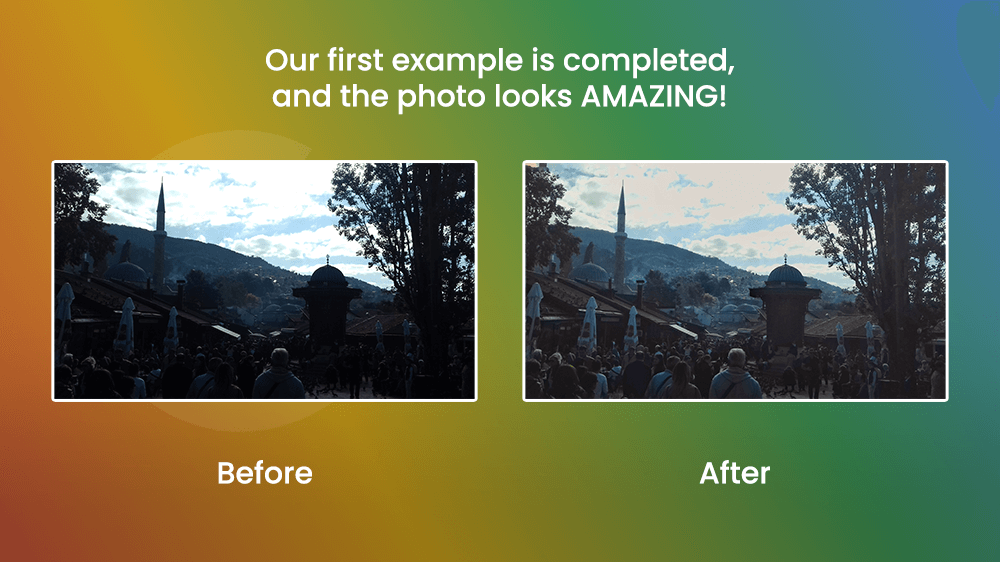
And with that, our first example is complete.
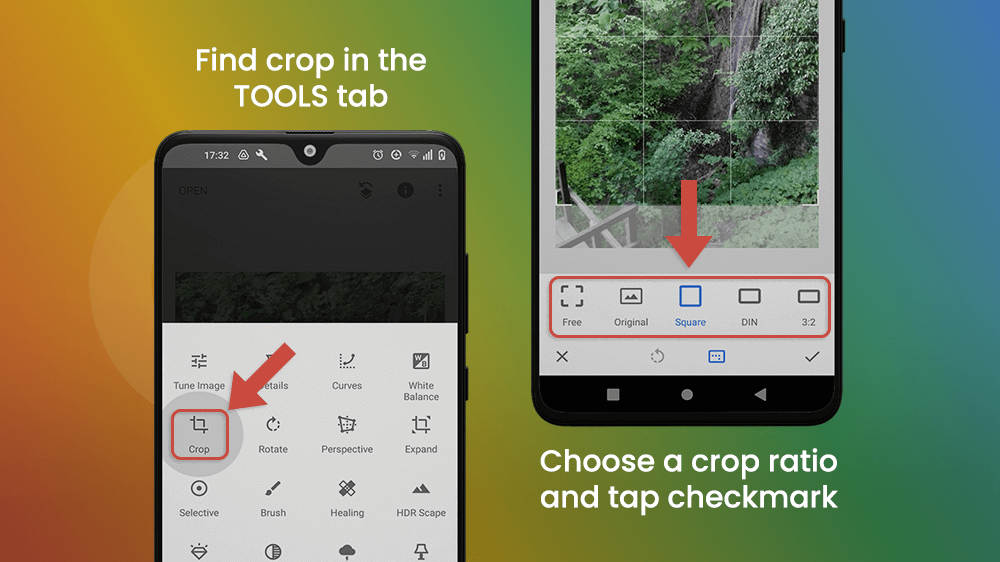
You can crop an image to suit your needs, but we will crop this image 1:1 for Instagram. When you choose a ratio, tap the checkmark in the bottom right corner.
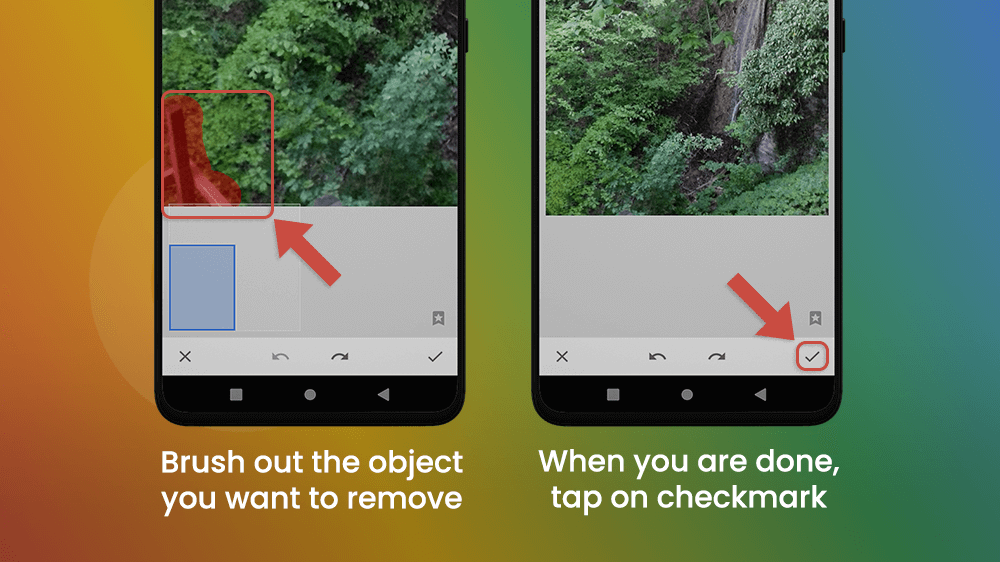
With the Healing tool, you can erase an object from the image. It doesn’t always work well, if the object is too big, for example.

I will use the Healing tool to erase part of the wooden platform in the lower-left corner of my photo. After opening the healing tool, zoom in on the object by dragging your fingers away from each other over the image and brush out the object you want to be erased.
The amount of filters in Google Snapseed is really astounding. They are divided into 14 categories in the TOOLS tab. Some of those categories are: Glamour Glow, Drama, Vintage, Grainy Film, Black & White. I want to add a vintage filter to my image with a stronger vignette on the edges.

I was never really a fan of images with text on them, but Google Snapseed has a few options that make creating such an image really fun.
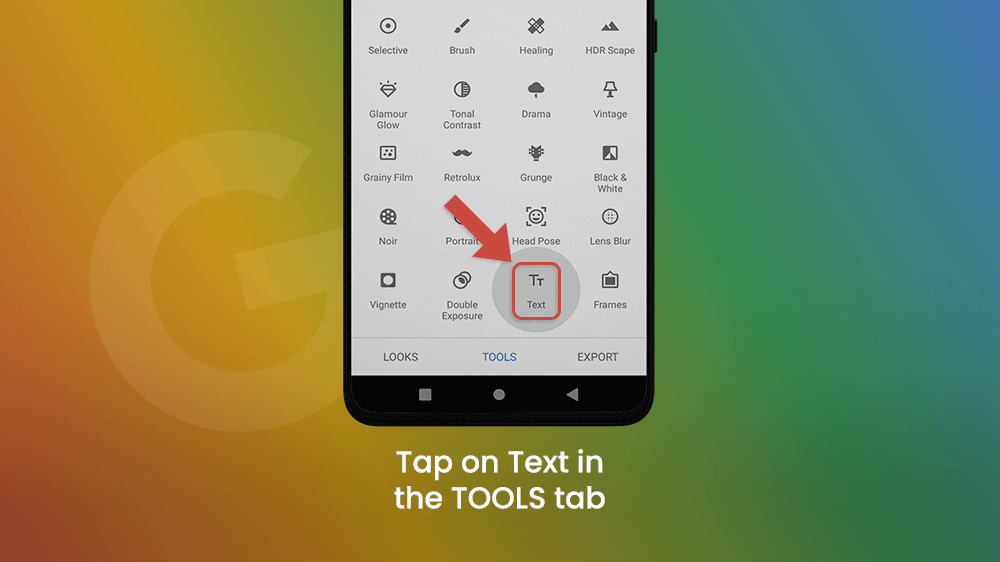
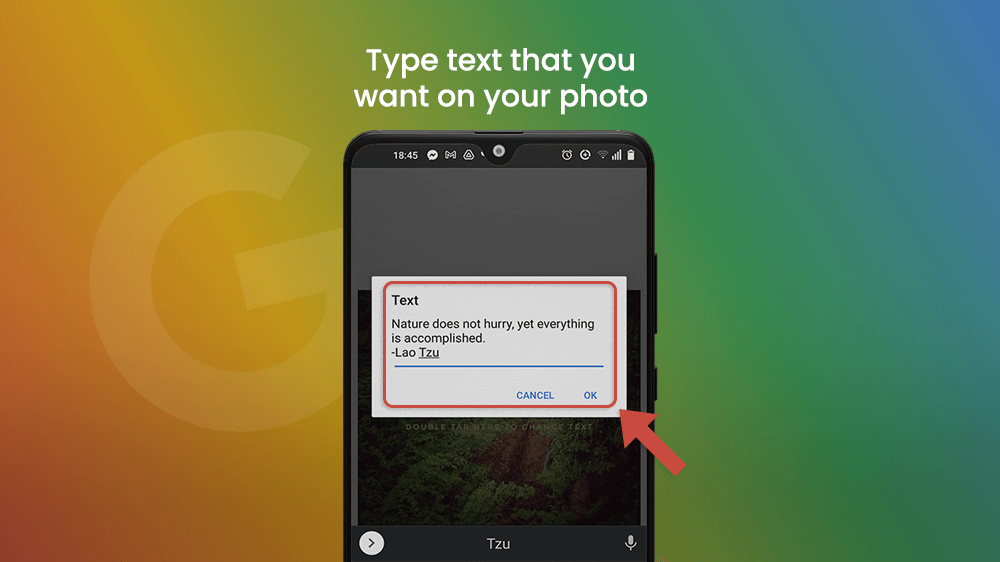
When you open the Text tool, tap on the image to write what you want.
There will be three icons at the bottom. You can change the color and choose from a list of word art templates. You can enlarge the text by stretching it across the image with your index and middle finger. A really cool thing is inverting the image and text while setting the saturation.
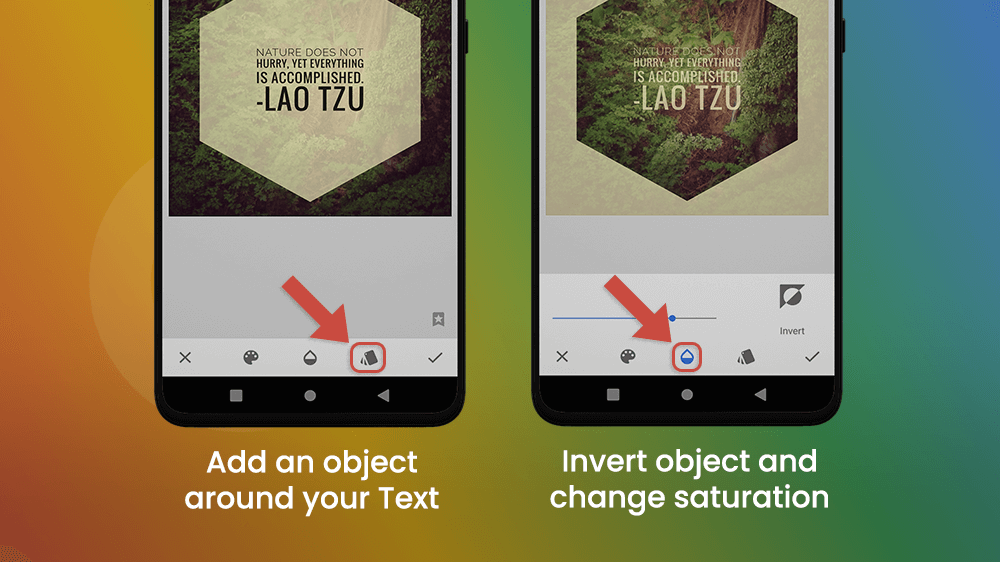
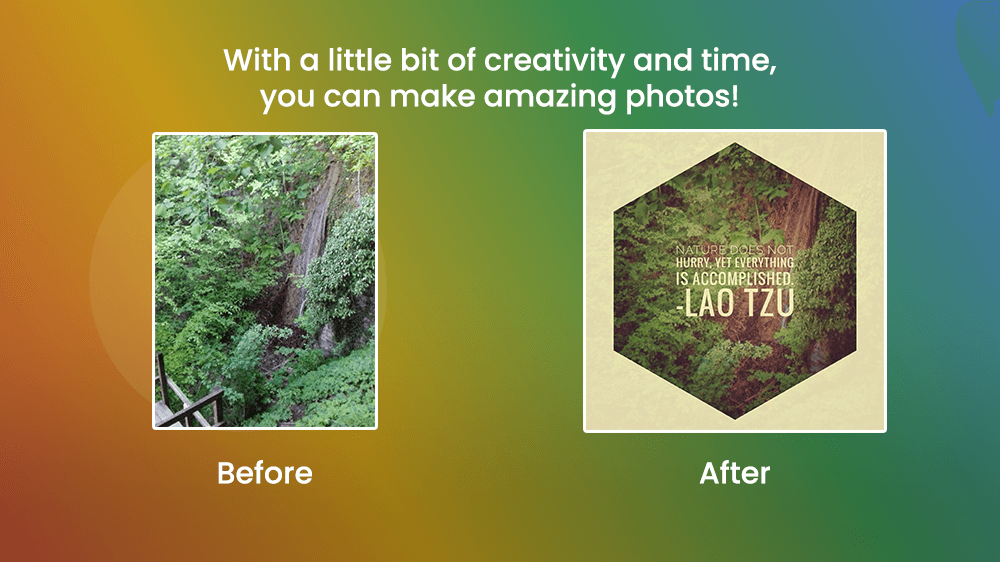
Check out the before and after photos side by side.
Final Thoughts & Recommendations
This was just a small description of what you can do. Try it out and see why editing a photo with Google Snapseed is so interesting, and so superior compared to other free photo editing apps. We weren’t able to cover everything, so feel free to experiment. To find out more about how to edit photos with Snapseed, check out the following tutorial: